Pages

Showing posts with label seed starting. Show all posts

Tuesday, May 15, 2012

Seedlings, and Closets and Trees, Oh My

This week, I'm taking a "staycation" from work, to try to get a bunch of stuff down around the house and garden.  Our schedule is chock full of appointments with landscapers, tree trimmers, and closet designers.

Yes, I have decided to get a custom closet in the master bedroom closet.  I will finally have built-in shoe racks!  It's quite fun - although a little overwhelming because you have to choose how you want the closet configured.  And once you decide, you're pretty much stuck with the outcome, so you have to choose wisely!  I know I need a lot of shoe space and the MOTH needs tons of drawer and shelf space for his enormous and continually expanding collection of T-shirts, many dating all the way back to the early '80s (have I mentioned he's all mine, ladies!).

We have between 4 and 6 appointments scheduled throughout each day.  We've received several estimates from tree trimmers, with suggestions on how to tame the hideous overgrowth in my backyard:

And a couple of landscapers who have promised to provide us with design plans and estimates.  Interestingly, they all tell me that the plantings the builder put in at the front of the house are all wrong for that space.  Most of them will have to be moved elsewhere, or just eliminated altogether.


The good news is, I shouldn't be too sad about the death of my poor tree:

Because, evidently, it was all wrong for that space too, and now we can just take it out and replace it with something more appropriate.  Oh, another piece of great news?  Evidently, there is a huge cluster of poison ivy growing in my backyard like a ground cover, and like a vine up the gigantic oak tree at the bottom of the yard.  That will have to go!

Any free moments in between appointments are spent on garden-related tasks.  Today, I planted some new seeds:


I also picked several clusters of disgusting tiny green insects off my Lettuce (Rosalita) and Swiss Chard:

I don't know anything about insects, but I think they were Aphids.  They did sort of look like this:

Courtesy of Wikipedia
Today and yesterday, I transplanted some of my seedlings into bigger pots.  Here are some different varieties of tomato, an ornamental black pepper, which I planted along with some parsley, and another parsley seedling that I've planted in a pot with some chives seeds.

Tomato Sweet 100 (Cherry tomatoes), which I grew from seed

Tomato Akers West Virgina, purchased at the Rutgers Garden day on Saturday

Ornamental black pepper (from Rutgers) with a couple of parsley plants grown from seed

A type of black tomato I can't remember the name of right now - purchased at Rutgers

Parsley from seed.  I planted some Chives seeds around the edge of the pot
Here is a long view of all the new pots lined up next to each other:

I added bamboo stakes to the tomato plants, so they can be tied up as they grow
These are all transplanted into organic potting mix with a little fish emulsion fertilizer.

Then, I snapped a shot of this little Arugula seedling, which I direct sowed in one of the garden beds in front of the house about two weeks ago.  I sowed about 6 seeds at the time and around 4 of them are coming up.  I previously started some Arugula seeds inside, but they did not do well -  I think they "bolted" because they were on heat mats and were probably too warm.  So, after that I started several more Arugula seeds inside (without heat mats) and these ones outside.  It will be interesting to see which turn out better.  However, since it looks as though my plant beds are all going to be disrupted in the landscaping process, I won't be direct sowing any more seeds in those beds for now. 


Finally, I planted this guy on the corner of my house.  I have no idea what or who he is.  I went to a  meeting of my local town garden club a couple of months ago and several people brought in plants from their gardens to exchange.  I ended up taking home this guy - the person who brought him could not remember his name, but said it is a flowering plant and grows well.  He has been sitting in his little pot for that whole time while I tried to decide where to put him.  Again, he will probably have to be moved in the landscaping process, but according to his original owner, he transplants very well, so I'm hoping he'll be fine.  If not ... well ... easy come, easy go?

Unknown plant from a stranger
 Tomorrow, we make another trip to home depot for more  pots and potting mix. 


Sunday, April 29, 2012

Busy, Busy Day

Whew! I'm exhausted.  Today was a busy day.  Although it's been a while since I posted, that doesn't mean I've been sitting around drinking champagne and eating bon bons.  Well actually, I have, but that doesn't mean I haven't been working really hard too!  The gardening stuff has been challenging because - well - you may not know this, but I have an incredibly demanding, busy job.  I commute a couple of hours to work each day and I work long hours and sometimes I travel (this week I was out of town for three days).  Fortunately, the MOTH has been helping a lot with watering the seedlings.  Today I started the hardening off process.  I probably should have started sooner, but just haven't been around enough to do it.  I put the seedlings outside in indirect light for much of the day and returned them to their basement home at around 4pm.

I started my day pulling weeds.  But, not in my garden.  Over the past few weeks, I was somewhat dismayed to discover that the beautiful pristine paving stones that cover my driveway and walkway were being besmirched by ugly weeds growing up in the cracks.  So this morning I spent several hours pulling weeds from between the pavers.  Now it looks like this:

Pavers after weeding - I should have taken a before photo


Meanwhile, I've been wanting to organize the junk in the garage and set up a work station - both for gardening and household projects.  So, I searched around and found this work bench for about $120.00 (including shipping):


We spent several hours assembling it today.  Once we figured it out, it was very easy to assemble but the instructions were so confusing and impenetrable that it ended up taking much longer than it should have.  We also ended up with several pieces of extra hardware, the purpose of which we simply could not deduce.  Anyway, here is how it looked in the end:

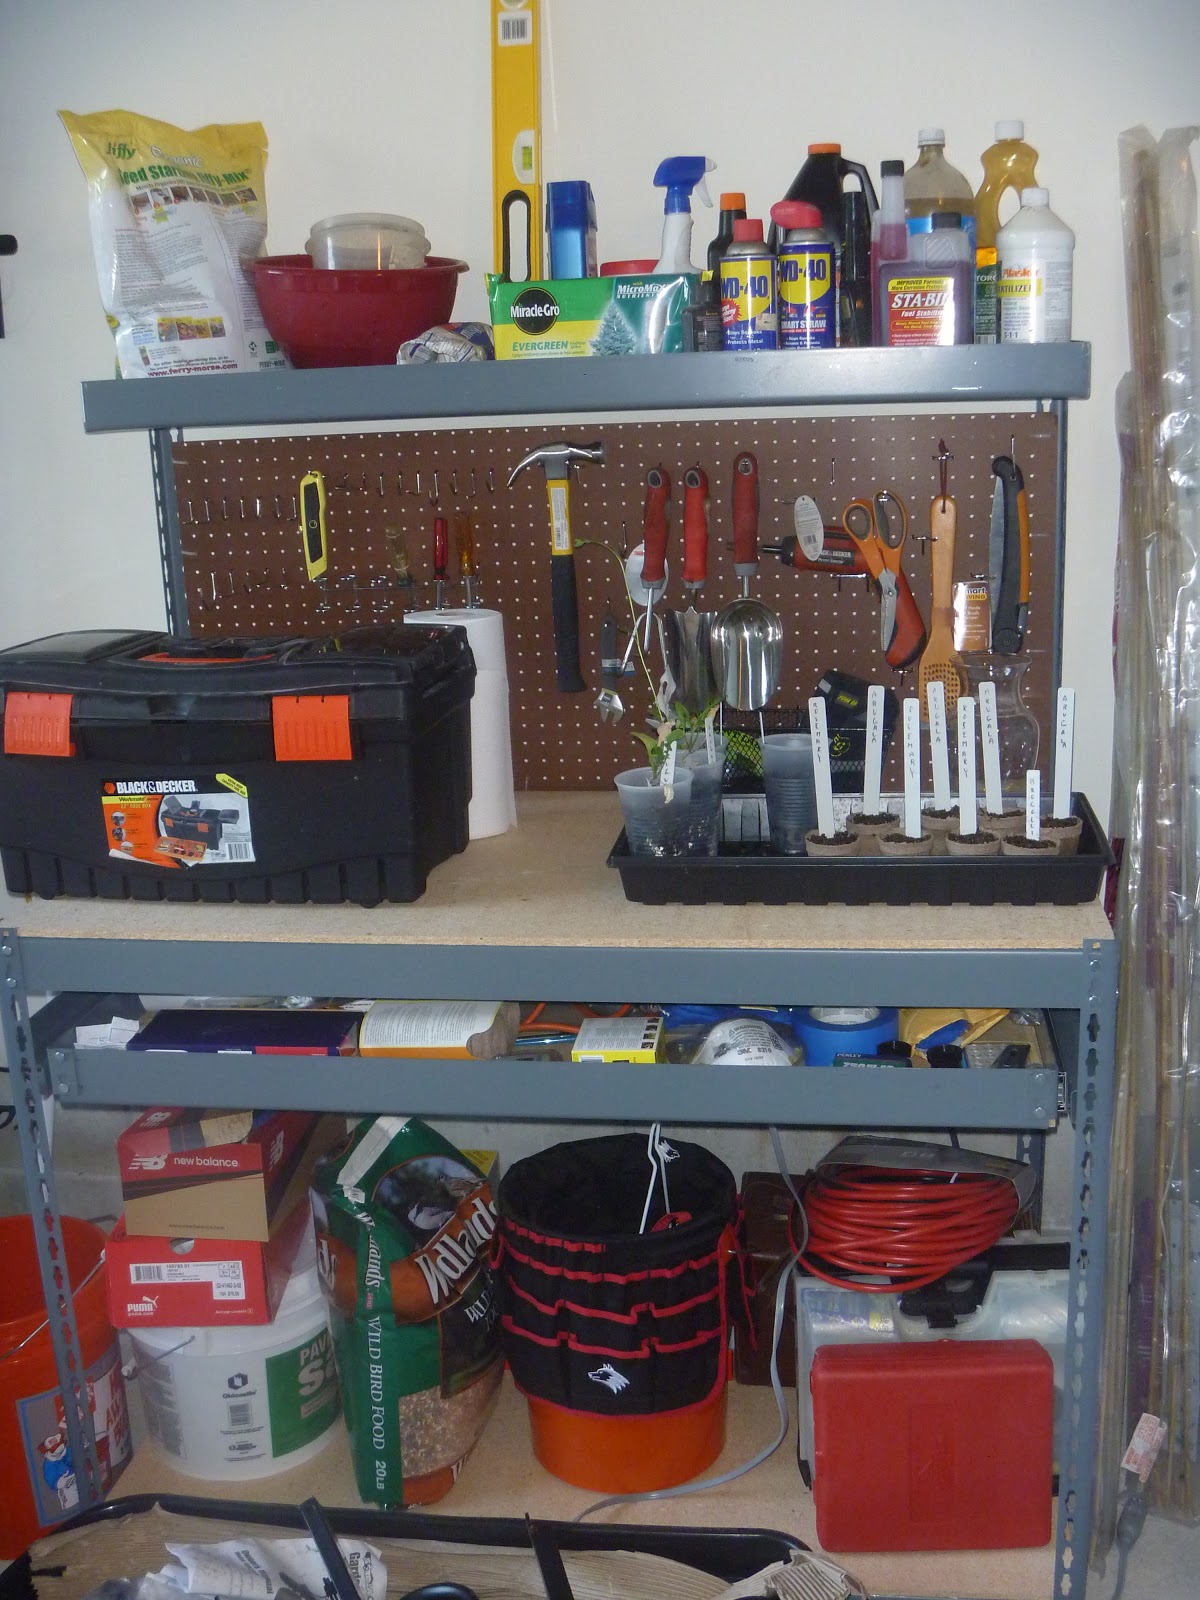
But that's not all we did today.  Oh no!  I'm on an organizational kick, so I put up this little beauty right next to my workbench:


I actually had to go to Home Depot to buy a "stud finder" (insert joke here), so that I could attach it properly. By the way, yes, I did attach it myself.  I have never used a "stud finder" before, but it was easy to figure out.  Then I drilled holes into the studs - I used an old drill that belonged to my dad and the big level you can see in the photo.  I have never had anyone teach me how to do this stuff - I've basically just had to figure out on my own (mostly using Google and little bit of common sense God gave me).  It may not seem like a big deal to people who are used to building stuff, but I grew up in New York City and never had any need or desire to be "handy."  I guess what I'm saying is, if I can do this, anyone can!

But I digress.  Anyway, I'm very happy with how it turned out.  I think we could use some shelving for additional storage . . . next project.  Anyway ... here's the long shot:


We decided to add the old clock at the last minute.  This is one of those situations where you almost throw something out that you think you will never use again.  We used to have this clock in our old kitchen and almost threw it out when we moved.  We didn't, and now I have a clock in my garage so I can keep track of time when I working.

In addition to hardening off our seedlings, I also started some new seeds.  My previous attempts at Arugula were not very successful.  It was suggested to me by a fellow blogger (thank you Melissa) that I might try it again without using heat mats, since Arugula is a cool weather plant.  So I have planted some new Arugula seeds in pots.  I have also planted some Rosemary and Broccoli, since my previous efforts were also unsuccessful:

I also planted some Broccoli and Arugula outside as well.  We'll see which comes out better:

Arugula planted outside

Broccoli planted outside

The other thing that happened today, is that we finally got our new lawn mower.  As some of you know, we only moved into this house last August.  Before that, we lived in a rental and we did not mow our own lawn, so I have never owned a lawn mower.  We did mow our lawn once last fall, by borrowing our neighbor's lawn mower.  But, I decided it was finally time to get our own lawn mower.  We bought one on sale at Lowe's and it was delivered today:


We were hoping to have time to assemble it today, but with everything we had to do, we ran out of time.  So it is still sitting in the box in our garage.  I also bought a garden cart from Amazon.com, that still needs to be assembled:
Garden cart - still in parts

How it should look after assembly

Finally, I've been extremely disturbed about a little evergreen tree in the front of my house.  About a month ago it looked like this:

That's the tree on the left side of the house

In the past few weeks, the needles have turned brown and fallen off.  Now it looks like this:

So sad
Based on my on-line research, it seems as though it could either be a lack of water or insect damage.  We haven't had a lot of rainfall here lately, so it could be drought.  I have been trying to water it a lot more.  Today, when we went to Home Depot, I mentioned it to one of the women in the garden center.  She thought it might be insect damage.  She suggested a combination fertilizer and insecticide that she said should help.  I haven't tried it yet, but I guess we will see if it works.


Monday, April 9, 2012

Holy Cow - These veggies better be delicious!

I'm exhausted

I spent hours yesterday transplanting these:


Into these:


By the end of the ordeal, my back was killing me, frankly.  I had no idea how exhausting it would be to transplant all those seedlings.  Hence, the title of this blog post.  These veggies better be freaking AWESOME!

Until now, I had my seedlings set up in the master bedroom closet, but now that I've transplanted them into bigger containers, they need more space.  So, I am setting up my potting center down in the basement.  It is a work in progress.  I set up two grow lights and dragged over some old furniture from the corners of the basement - some shelves and an old chair.  I added an old clock that used to be in our kitchen:


Then I brought down a rug that I purchased in Morocco several years ago and threw some cushions on the floor.  I don't have a potting bench yet, so - for now - I am using my boyfriend's old coffee table and side table (circa 1980's).  And voila! My new gardening center:

Here is a close-up of the seedlings:


In case you're wondering, yes, those are kitty litter boxes.   I sent the boyfriend to Home Depot to find plastic trays for the transplants and guess what? They didn't have any!  Now, tell me.  Why would you sell seeds, and seed starting trays, and all kinds of other plant related stuff, but not simple, basic plastic trays to put your seedlings on after they outgrow the little seedling starter packs that you sell?

So, being the creative, industrious people that we are, we went over to Walmart and bought their cheapest kitty litter trays and that's what we are using for our seedlings.  And, fortunately, even if I decide one day to give up seed starting - kitty litter trays will never be out of fashion in this house:


Saturday, March 31, 2012

Seedling Update - Good News and Bad News

Two weeks ago my seedling tray looked like this:

Seedlings on March 15, 2012

Here are some shots from this morning - going from left to right in the tray - showing four columns at a time.  The full planting layout is here.


First and Second Columns: Tomatoes; Third Column: Peppers;
Fourth Column: Peppers, Basil


Fifth Column: Basil, Rosemary and Sage; Sixth Column: Sage,
Broccoli; Seventh Column: Arugula, Parsley; Eighth Column: Chives

Ninth and Tenth Columns: Chives;
Eleventh Column: Lavender;  Twelfth Column: Parsley
As you can see, the tomatoes and basil are coming up pretty well.  But several of the other pods look completely empty.  Are they dead or just slower germinators?  I have no idea.

Also, the Arugula is either falling over (as you can see from the close up below), or the leaves have become all white and singed looking.


An even closer close up of the poor Arugula:


I'm considering doing a second phase of new seedlings, but haven't gotten around to figuring out what to plant or how to plant it.  I don't think I would use the large jiffy container again, since I don't think it works well for a variety of plants that grow at different rates.  But if I don't use that, I have to get (or find) smaller individual containers and fill them with seed starting mixture.  Will have to give that some more thought.


Wednesday, March 14, 2012

First Sprout!

The MOTH sent this photo to me at work today.  Our first seedling!
Looks like it is the Arugula.  The wider shot below seems to suggest the Broccoli is starting to come up as well (column 6, row 3):


Monday, March 12, 2012

Started My Seedlings

Yesterday, I finally started some of the seeds I bought last week.  I used the Jiffy 72-cell starter pack. Here is the layout of the seeds I planted.  I had to soak the flat parsley seeds overnight, so I added those today.  I ended up soaking too many to fit in the last remaining cells of the starter pack, so I improvised and planted the extra parsley seeds in some tiny plastic cups.  (We have a bunch of these that the MOTH uses to collect urine samples from Ghost and take to the vet.  This enables us to test Ghost regularly without the disruption of a vet visit.  He is 17 years old and has CRF, along with various other ailments so we like to keep him as comfy as possible in his old age).  Anyway, so I punched holes in the bottom of four plastic cups, stuck in some moist peat that I bought to amend the soil in the veggie plot, and plopped in the extra seeds.  I then put the four cups into an old Chinese food container that I use for storing leftovers and covered it with a plastic cover that I bought to cover plates in the microwave, but which I've never actually used.

Here is a photo of all the seeds, taken today:

72-cell starter pack on the right; circle of Parsley on the left
I have ordered a grow light and heat mats from Amazon, which should arrive in the few days.  I probably should have waited for the heat mat to arrive before starting the seeds, but I am keeping them in a warm place for now.  After much discussion with the MOTH, we decided to set up the seed starting station in the walk-in closet, since that is the one room the cats are not allowed into.  It is plenty large, so we dragged up an old coffee table from the MOTH's bachelor days (Oh yes, particle board covered with  marbleized laminate and fake brass legs - hands off, ladies, he is all mine).  It may be UCTU (the ugliest coffee table in the universe), but I think it is the perfect size for my seed starting project.  Once the grow lights and heat mats get here and the seeds have started to sprout, I will move them up to the closet.  Pics to come!