Pages

Saturday, March 31, 2012

Seedling Update - Good News and Bad News

Two weeks ago my seedling tray looked like this:

Seedlings on March 15, 2012

Here are some shots from this morning - going from left to right in the tray - showing four columns at a time.  The full planting layout is here.


First and Second Columns: Tomatoes; Third Column: Peppers;
Fourth Column: Peppers, Basil


Fifth Column: Basil, Rosemary and Sage; Sixth Column: Sage,
Broccoli; Seventh Column: Arugula, Parsley; Eighth Column: Chives

Ninth and Tenth Columns: Chives;
Eleventh Column: Lavender;  Twelfth Column: Parsley
As you can see, the tomatoes and basil are coming up pretty well.  But several of the other pods look completely empty.  Are they dead or just slower germinators?  I have no idea.

Also, the Arugula is either falling over (as you can see from the close up below), or the leaves have become all white and singed looking.


An even closer close up of the poor Arugula:


I'm considering doing a second phase of new seedlings, but haven't gotten around to figuring out what to plant or how to plant it.  I don't think I would use the large jiffy container again, since I don't think it works well for a variety of plants that grow at different rates.  But if I don't use that, I have to get (or find) smaller individual containers and fill them with seed starting mixture.  Will have to give that some more thought.


Friday, March 23, 2012

Garden Classes Tomorrow!

Tomorrow, we go to the Home Gardeners workshop at Rutgers.  I'm very excited.  I'm signed up for the Rain Barrel workshop in the morning.  In the afternoon, I am attending Creating Curb Appeal and Healthy Garden Soil.

Will report back!

Sunday, March 18, 2012

Tackling the Front

For the past few weekends I've been spending a lot of time in the backyard, mostly just trying to clean things up.  This has resulted in numerous bags and tree limbs sitting in front of my house awaiting pick-up:


Yesterday, I spent a few more hours prepping the side veggie plot - adding some compost and manure and raking it all in - getting it all ready for these babies when they're big enough:


Today, I decided to tackle the front yard, which has been sadly neglected.

I think of the front yard as being divided into three areas, all of which came with the plants shown in the photos when we bought the house in July  2011.

The Front Lawn (with Ugly Tree):


The Front Left plot:


 The Front Right plot:


Today, I spent several hours raking and bagging old dead leaves from the front lawn and both plots.  Since the Front Left plot gets a lot of light, I decided to throw caution to the wind and plant some veggie seeds directly in the plot, around the existing plants.  I dug around in the soil, threw in some amendments, watered and planted some seeds: two types of lettuce, swiss chard, spinach, and carrots.  Who knows if anything will actually grow, but I figured it was worth a try.

Here is how it looked afterwards:

Location of Lettuce and Swiss Chard
Location of Carrots and Spinach
It's amazing how you can spend hours and hours working in the garden and afterwards you're like - hmmm, it doesn't look all that different from when I started.

Wednesday, March 14, 2012

First Sprout!

The MOTH sent this photo to me at work today.  Our first seedling!
Looks like it is the Arugula.  The wider shot below seems to suggest the Broccoli is starting to come up as well (column 6, row 3):


Monday, March 12, 2012

Started My Seedlings

Yesterday, I finally started some of the seeds I bought last week.  I used the Jiffy 72-cell starter pack. Here is the layout of the seeds I planted.  I had to soak the flat parsley seeds overnight, so I added those today.  I ended up soaking too many to fit in the last remaining cells of the starter pack, so I improvised and planted the extra parsley seeds in some tiny plastic cups.  (We have a bunch of these that the MOTH uses to collect urine samples from Ghost and take to the vet.  This enables us to test Ghost regularly without the disruption of a vet visit.  He is 17 years old and has CRF, along with various other ailments so we like to keep him as comfy as possible in his old age).  Anyway, so I punched holes in the bottom of four plastic cups, stuck in some moist peat that I bought to amend the soil in the veggie plot, and plopped in the extra seeds.  I then put the four cups into an old Chinese food container that I use for storing leftovers and covered it with a plastic cover that I bought to cover plates in the microwave, but which I've never actually used.

Here is a photo of all the seeds, taken today:

72-cell starter pack on the right; circle of Parsley on the left
I have ordered a grow light and heat mats from Amazon, which should arrive in the few days.  I probably should have waited for the heat mat to arrive before starting the seeds, but I am keeping them in a warm place for now.  After much discussion with the MOTH, we decided to set up the seed starting station in the walk-in closet, since that is the one room the cats are not allowed into.  It is plenty large, so we dragged up an old coffee table from the MOTH's bachelor days (Oh yes, particle board covered with  marbleized laminate and fake brass legs - hands off, ladies, he is all mine).  It may be UCTU (the ugliest coffee table in the universe), but I think it is the perfect size for my seed starting project.  Once the grow lights and heat mats get here and the seeds have started to sprout, I will move them up to the closet.  Pics to come!


Saturday, March 10, 2012

Daffodil Update

You may recall that I discovered these babies in my backyard last week. They were a bit droopy:

This is how they look today - much better:


Hello sunshine!

My Embarrassing Backyard

I live in a lovely new house, but my backyard is a disaster.  When we bought it last July, it had a blanket of green lawn, which promptly died after we moved in due, in part, to the shade caused by several large trees.  Not only that, as I've mentioned before, I never raked up the leaves from last fall.

Leaf-covered corner of my backyard
Plus there are several large "trees" that may have started their lives in my neighbor's backyard, but appear to have broken through the border and possibly even have propagated in my yard.  They have long branches that worm their way around the other trees in my yard and are covered in green leaves.  I'm starting to wonder if they are really just enormous weeds and not actually trees at all.  They are kind of ugly.

Green monstrosity
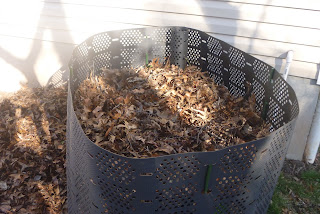
I finally started the process of raking the yard last week, using the leaves to start my new compost bin.  Today I spent several hours raking the rest of the rest of the leaves, but with my compost bin completely full,

Geoffrey, the Geobin - completely full
I left the leaves sitting in random piles around the yard.

No, those are not dead bodies buried all over my yard
I'm too tired to deal with them, so I will probably just bag them tomorrow.  The MOTH has promised to help, but now he's not "feeling well" so I may be on my own again.  Poor Pookums.

I also started to "prune" some of the trees/weeds/stuff at the back border of the yard, because it has grown so dense, it's basically just a mess back there.  I don't know if I should be "pruning" these plants or if they're thinking - "Hey, Idiot! What the heck are you doing? You're not supposed to be chopping my branches off!  Will you please go read a blog entry on pruning!"

After cutting back some of the mess
After today's foray, I'm even more convinced I should hire a landscape designer to help me with a cohesive plan for the front and back yards.  Even though my yard is pretty small, it is just too overwhelming to handle this by myself, particularly when half the time, I can't tell the difference between a plant and a weed.

Here are some more shots of the hideous backyard.  Don't you love the randomness of the neighbors' ugly fences juxtaposed against each other:

Geoffrey's view of the backyard
Another angle - I know, horrible.
Fortunately, I came back inside to this snuggle-fest:

Emma and Ghost

Sorry, didn't mean to disturb you - as you were
 So, that makes everything okay.

Sunday, March 4, 2012

Gardening Class

I'm planning to go to this gardening program at Rutgers on March 24.  It's divided into four sessions, each of which has several classes you can choose from.  Now I have to decide which to attend.  I think I may have convinced the MOTH (man of the house) to join me, even though he's relegated all gardening responsibilities to me.

Here is the schedule:

AM Workshops

Session 1:
9:00am-11:45am (Double Session - Spans Entire Morning):
#1:- How to Make a Rain Barrel: Hands-On Workshop
9:00am-10:30am
#2: Color in the Garden - New!
#3: Managing the Good and Bad Bugs in Your Garden - New!
#4: Spring and Summer Turf Management
#5: Composting: As the Worm Turns

#6: What Plant, Where? Planning Your Home Landscape - New!
#7: Canning Fruits and Vegetables
#8: Controlling Common Pests in the Vegetable Garden - New!
#9: Trees and Their Care

Session 2: 10:45am-11:45am

#10: Adding Ornaments for Garden Interest - New!
#11: What’s Wrong with My Plant?
#12: "Uh-Oh!" Plants
#13: Plant Propagation: Cool Plants in Small Batches - New!
#14: Designing Your Landscape to Reduce Energy Costs; Alternative Energy Options for Your Home - New!
#15: Organic Foods: What Do We Mean? - New!
#16: Growing Tomatoes Successfully
#17: The Do’s and Don’ts of Butterfly Gardening for 2012 - New!


Lunch Break: 12:00pm-1:00pm

Keynote Presentation:
“GARDEN STATE” – THE IMPORTANCE OF NEW JERSEY AGRICULTURE


PM Workshops

Session 3: 1:15pm-2:15pm
#18: Creating Curb Appeal - New!
#19: Common Plant Disease of Ornamentals
#20: An Appreciation of Wine
#21: Lawn and Landscape Care Without Using Pesticides - New!
#22: Easy Garden Walkways - New!
#23: Curious, Weeping, Unique and Bizarre - New!
#24: Successful Plant Selection for a Healthy Garden - New!
#25: Eco-Friendly and Drought Tolerant Native Plants - New!
#26: Interesting Hollies for the Mid-Atlantic - New!

Session 4: 2:30pm-4:00pm

#27: Fresh Flower Arranging: Hands-On Workshop
#28: Hostas for Garden Texture
#29: Landscape Product Advertising: Fact or Fiction? - New!
#30: Backyard Chickens and Their Care - New!
#31: Perennials for Year-Round Interest - New!
#32: Beekeeping 101
#33: Healthy Garden Soil
#34: Easy Drip Irrigation for Your Garden - New!
#35: Best Management Practices: Proper Pruning Techniques

The Garden Plan (a work in progress)

The Current Plan for the Veggie Garden

I haven't made a final decision about what my veggie garden will look like.  I signed up for the free trial of the garden planner at Growveg.com and have been experimenting with different ideas.  This is my latest plan.  From left to right, top to bottom, it will have 9 bean plants, 2 cucumber, 4 different types of tomato plants, 4 parsley, 1 lavender, 2 different types of pepper, another lavender, 1 rosemary, a bunch of chives, 1 oregano, 8 basil (2 different types) and 1 sage.   Here is some more info about the plan.

The Growveg.com garden planner seems pretty useful.  It gives you a timeline of when your plants can be started indoors, planted outdoors, and harvested, based on the frost dates in your area. I have no idea how accurate it is.  I'm sure my free trial will be ending soon, so I'll have to decide whether to keep it.  No decision made at this time.  I do really like their website and blog, however.  It has a lot of helpful information.

My First Seeds

I went to Home Depot yesterday to pick up some more gardening supplies.  I hadn't planned on starting any seeds indoors this season (I figured I would buy transplants and direct sow seeds, since I'm not really set up to start seeds).  Of course, once I got there and saw all the pretty seed packets, I couldn't resist.  I guess I'm a sucker for glossy marketing, even in the gardening department.  So, I bought a bunch of seed packets and one of those indoor seed starter thingies.  I didn't have time to set it up this weekend, so it will probably have to wait until next weekend.

I bought pretty much anything that said it could be started indoors and transplanted later.  I am holding off from buying anything that says "Direct Sow," since I can't do anything with them yet.  I got several different kinds of tomatoes and peppers, so I can see which ones grow best and/or taste best.  Anyway, here is my very first set of seed packets:

My First Seed Packets - March 2012
  •  Martha Stewart Brand:
    • Basil Genovese
    • Basil Sweet
    • Chives
    • Parsley Moss Curled
    • Tomato Beefsteak
  • Burpee Brand:
    • Rosemary
    • Sweet Pepper Carnival Hybrid Mix
    • Hot Pepper
    • Sweet Pepper
    • Tomato - Super Sweet 100 Hybrid
    • Tomato - Early Treat Hybrid
    • Tomato - Best Boy Hybrid
    • Tomato - San Marzano
    • Sage, Common (oops, I accidentally bought two packs of this)
    • True Lavender

Well, Lookie Here

It turns out my lawn is not the barren wasteland I thought it was.  These green cuties have been poking their heads out of the ground for the past few weeks.

Bless Their Little Green Heads
I figured they were some kind of bulb, but who knows? I'm no expert.  For all I know, they're weeds.  Then yesterday I saw this:

Why so droopy?
Am I supposed to do something with these guys? Water them? I don't know.  There are actually more of them, but no rhyme or reason to where they're planted:

Anyway, I'm happy to see them.  Maybe there are more surprises in store.

Update:  I watered them.  Not sure if that was a good idea or not ...

An Inspiring Gardener


The other day, I came across these videos of gardener Ruth Stout via Cold Antler Farm.  I'm inspired by her positive attitude, independent spirit, and unwillingness to do any work that wasn't absolutely necessary. Here's some Wikipedia info about Ruth (who, evidently was the sister of Rex Stout, one of my favorite mystery writers).  Ruth Stout wrote the book Gardening Without Work, which I'm seriously thinking about buying. 

A City Girl Tries Composting

One of the earliest decisions I made when I started my gardening research was to have a compost bin. Although I had heard of composting before, I had no real sense of what it was. I vaguely associated with ancient hippies I'd met in California or radical environmental extremists who checked out of society to go live off the land.  I'm kidding of course, but certainly no one I knew in New York City composted their waste - not even my friends in Brooklyn.  Or at least I assumed not, since I rarely left Manhattan to travel as far as Brooklyn to find out.

But, as I read about it, composting just made sense.  It made no sense to spend a bunch of time and energy raking leaves and mowing grass to dump in a landfill and then go out and spend a bunch of money to buy compost made of the same kind of stuff you just threw out.  But, frankly, I was terrified of making a mistake. How do I know what kind of compost bin to get? How do I know what to put in it? How long will it take? Will it smell? Is it legal where I live? (Apparently it is.  My county actually subsidizes compost containers to encourage composting.)  So, after MUCH research, I finally ordered the Geobin from Amazon (that is not a sponsored link, by the way).  I chose that one after watching these helpful videos comparing all different kinds of composters (credit to Dave Wilson for posting these on YouTube): 

 
 Testing Home Compost Units: Intro

 
Part 2

Part 3 - the Results!


Geoffrey the Geobin arrived a few weeks ago and sat patiently in my garage where I would nervously glance at him on my way to and from the car.  Finally, yesterday, I could avoid it no longer.  I finally fastened Geoffrey's edges together to form a huge circular container and hammered the stakes into the ground behind my house (just around the corner from my new veggie bed).  I then spent two hours raking up old, damp leaves that had been covering my backyard all winter (see my mea culpa here).  I threw in a few kitchen scraps I'd been saving and, voila! My new compost bin:


A close-up shot of Geoffrey:


I should note that almost everyone recommends that leaves be "shredded" before composting.  At this point, I do not own anything capable of shredding leaves (I'm sure my lovely boyfriend would not appreciate me running our dead, slightly rotting leaves through his paper shredder).  So, I realize this material will probably take a lot longer to decompose than if I had shredded it.  That's okay.  I will be patient.  Meanwhile, I guess I will be buying any compost I need this season from the garden store.  Sigh.

My First Tentative Step

After months of research, I took my first cautious step into the garden a couple of weeks ago.  I decided to start my new veggie garden bed.  After much consideration, I picked a location on the south side of my house. It seems to get the longest sun exposure throughout the day, although the sun only hits a narrow sliver because of the shade caused by the neighbor's house.

The site of my new (very narrow) veggie garden.  Note the offending shadow from my neighbor's house.
I decided to use a method called "lasagna" gardening, where you cover the area with a layer of wet newspaper and build layers of compost material and soil to form a raised bed.  First, I measured out the space (6 ft by 3 ft) and marked it by sprinkling some flour around it.  Then, I dug a trench around the edges, layered the whole thing with newspapers, soaked it with the garden hose and covered the planting area with old leaves (which I had never bothered to rake up from my back yard the previous fall).  Yes, I'm a terrible neighbor, but keep in mind I had just moved into the new house and I was completely ignorant about suburban etiquette, like it's considered rude not to rake your yard.  All of my neighbors were very nice and said nothing about my offense, probably because I'm new to the neighborhood and home ownership.

The veggie bed in progress

Then I continued to layer and water, layer and water.  Finally I topped it off with some soil and black plastic garbage bags, weighed down by the numerous rocks and stones I had just dug out of the very dense, clay soil surrounding my new veggie bed.  By the way, this discovery convinced me that I made the right decision to create a raised bed, rather than trying to double dig the soil in my yard. Oy!

The new veggie bed, after several layers, but before covering with black garbage bags.
As the compost materials decompose, the bed will lose some height, so I plan to add some bags of soil today (purchased from Home Depot yesterday).  I also bought a bag of fertilizer, but haven't completely decided whether to add it to the veggie bed yet.  There seems to be some difference of opinion about whether to add fertilizer or not.  I also haven't decided whether to add some edging to the bed, such as bricks or cinder blocks.  I will put the question out into the universe and see what comes back.